Getting Started
If you’re already familiar with Agrippa, and want to set it up in an existing project, see Set up Agrippa in a project.
Welcome!
In this tutorial we’ll generate our first few components with Agrippa.
Without further ado, let’s begin:
Creating a fresh project (optional)
First, if you don’t already have a project set up, let’s spin up one:
We’ll use Vite to scaffold a new environment with React & Typescript. Create a new Vite project & install dependencies from your terminal, like so:
# npm
npm create vite agrippa-101 -- --template react-ts

cd agrippa-101
npm install
npm run dev

# vite
yarn create vite agrippa-101 --template react-ts

cd agrippa-101
yarn
yarn dev

# pnpm
pnpm create vite agrippa-101 -- --template react-ts

cd agrippa-101
pnpm install
pnpm run dev
If everything succeeds, you should be able to navigate to http://localhost:3000 and see Vite’s default home screen.
Please note
In the next steps, we’re assuming you’re working in a React & Typescript environment (like the project we’ve just created). Everything should still work if you aren’t, but you might see slightly different results.
Configuring Agrippa
Next, let’s install Agrippa:
# npm
npm i -D agrippa
# or
yarn add --dev agrippa
# or
pnpm add -D agrippa
Then, let’s create a config file - this is you can configure Agrippa for your current project. In your terminal, run:
# npm
npx agrippa init

# yarn
yarn agrippa init

# pnpm
pnpm exec agrippa init
You should now see a new file in your root directory (where agrippa init was called), agrippa.config.mjs. Its contents should look like this:
// @ts-check
import { defineConfig } from "agrippa";

export default defineConfig({
  options: {},
});
We’ll play around with the config in a few minutes, but for now let’s leave it as it is.
Your first component
We’re now ready to start generating components!
Let’s start with a basic one. In your terminal, run:
# npm
npx agrippa gen my-first-component

# yarn
yarn agrippa gen my-first-component

# pnpm
pnpm exec agrippa gen my-first-component
Congratulations, you’ve just generated your first component with Agrippa 🎉🎉
The gen (or the more verbose generate) command is Agrippa’s main command. It expects a single positional argument - my-first-component in our case - which is taken to be the component name (it can be either kebab-case or PascalCase).
The command will create a new directory under your current working directory, MyFirstComponent. Take a look inside! there should be two files:
MyFirstComponent.tsxis the main component file - it contains the React component code and a Typescript props interface.index.tsis a standard index file - currently it only exports everything from the main component code.
Back in your terminal, the output should be similar to this:
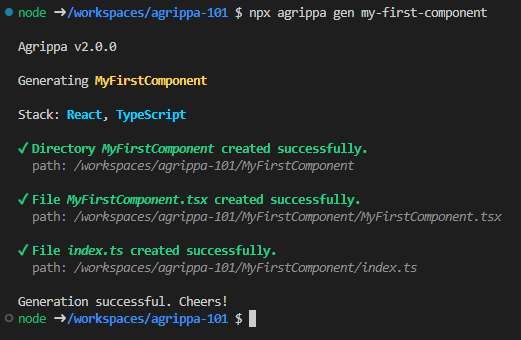
Note how Agrippa detects you’re working in React and Typescript without any configuration on your part! One of Agrippa’s design principle is auto-detection of the project’s stack - providing you good results with minimal friction.
Setting a baseDir
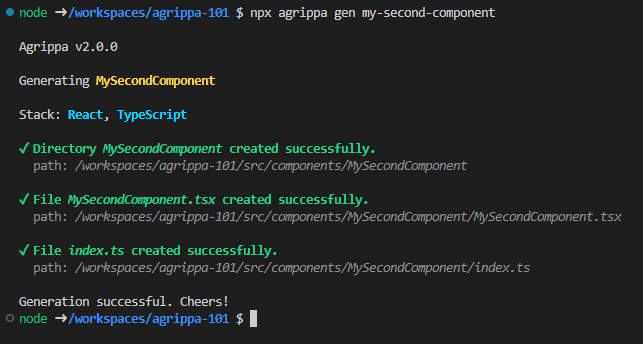
You might also have noticed that the component folder was created in the current working directory - typically, your project’s root.
Many projects, including our setup here, have a specific directory for components in the app - src/components in our case.
We can tell Agrippa to treat a given path as the base directory for all components through the baseDir option.
Augment agrippa.config.mjs like so:
// @ts-check
import { defineConfig, Styling } from "agrippa";

export default defineConfig({
  options: {
    baseDir: 'src/components', // new line
  },
});
Now, let’s create another component:
# npm
npx agrippa gen my-second-component

# yarn
yarn agrippa gen my-second-component

# pnpm
pnpm exec agrippa gen my-second-component
Now the component files should be created under src/components/MySecondComponent:
You can also tell Agrippa to generate a component relative to the base directory (as opposed to a direct children of it). For more information, check out Base Directories.
Next, let’s add some styles:
Adding styles
A component declaration is nice, but most components also need styling!
Let’s configure Agrippa to create a CSS file for each component we create:
// @ts-check
import { defineConfig, Styling } from "agrippa";

export default defineConfig({
  options: {
    baseDir: 'src/components',
    styling: Styling.CSS, // new line
  },
});
Styling.CSS is equivalent to "css", but using the built-in Styling enum is clearer and less prone to errors.
Let’s test it out:
# npm
npx agrippa gen my-third-component

# yarn
yarn agrippa gen my-third-component

# pnpm
pnpm exec agrippa gen my-third-component
This time, the output should also contain information about a created CSS file:
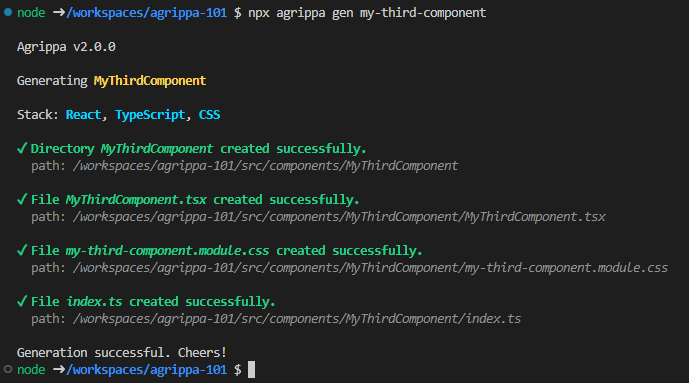
Note that the created file is by default a CSS module.
Let’s try another styling option.
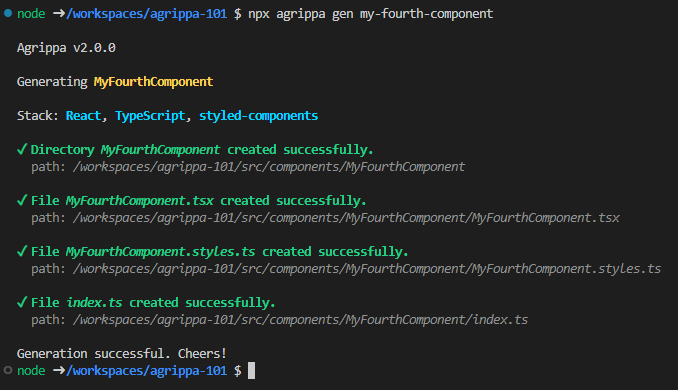
Back in the config, change Styling.CSS to Styling.STYLED_COMPONENTS, like so:
// @ts-check
import { defineConfig, Styling } from "agrippa";

export default defineConfig({
  options: {
    baseDir: 'src/components',
    styling: Styling.STYLED_COMPONENTS, // modified line
  },
});
And create a fourth component:
# npm
npx agrippa gen my-fourth-component

# yarn
yarn agrippa gen my-fourth-component

# pnpm
pnpm exec agrippa gen my-fourth-component
Now, the output should contain information about MyFourthComponent.styles.ts being created:
Tip: Overriding styles
All the options that Agrippa accepts in the config file can also be passed directly to the CLI (in kebab case). CLI options have a higher precedence, making them useful for overriding the project configuration for a single component.
For example, if most of your components have CSS files for styles, but this next component you’re creating needs no styles, you can pass --styling none to Agrippa and it’ll skip creating a CSS file for that one component.
By now, we hope you’ve already gained an appreciation for how easy it is to generate components from scratch with Agrippa. It has a few additional tools at its disposal to adapt itself to your project and increase your productivity.
We’ll conclude this tutorial with one last neat feature:
Post Commands
An important aspect of Agrippa is its plugin system. Let’s augment Agrippa’s functionality using one:
A post command is a command that runs after Agrippa’s main process. It has access to some of the values Agrippa determines, and particularly - the paths of the created files. This allows us to run side effects on created files.
One neat such side effect is opening your IDE at the generated component file, immediately after generating it. Our example will use Visual Studio Code, but this works with practically any other common IDE too.
Back in agrippa.config.mjs, add the following lines:
// @ts-check
import { defineConfig, Styling, PostCommandPlugin } from "agrippa";

export default defineConfig({
  options: {
    baseDir: 'src/components',
    styling: Styling.STYLED_COMPONENTS,
  },
  // new lines
  plugins: [new PostCommandPlugin("code -r <componentPath>")],
});
(note the new import of PostCommandPlugin from agrippa!)
As seen in the example, a post command as declared as a plugin - the PostCommandPlugin, which is one of Agrippa’s built-in plugins. The argument passed to its constructor is the command to run - in our case the code command, which launches VS Code at the path passed to it. <componentPath> is the path of the component declaration file.
Let’s see it in action! In your terminal, create yet another component:
# npm
npx agrippa gen my-fifth-component

# yarn
yarn agrippa gen my-fifth-component

# pnpm
pnpm exec agrippa gen my-fifth-component
VSCode should automatically open the component declaration in a new tab (or in a new window if there aren’t any open), and Agrippa should include information about the additional step (the post command) in its output.
Isn’t this an elegant productivity trick?
Where to go next
Congratulations! You’ve completed the tutorial - you installed and initialized Agrippa in a project, and have already created four different components, with different configurations! Hopefully, you got a taste for the tool’s simplicity and effectiveness, and you can start using it in your projects.
So, what’s next? pick your path:
-
❤️ Join Us on GitHub! We’d also love to hear your thoughts and suggestions about Agrippa - as a GitHub issue or on Twitter.
-
⚡ Become a power user by learning about more of Agrippa’s features and abilities by checking out our guides! See Automatically open your IDE to a generated component and Lint & Prettify created files.
-
📚 Learn more about Agrippa’s options, features and interfaces in our environment and reference pages. Check out, for example, our pages on React, Base Directories and Config Options.